By Dave Rumson, slitting educator and consultant
Introduction
Throughout my converting-industry years, traveling to customer facilities to review their winding and slitting machinery, speaking at tradeshows and technical conferences and conducting my Assn. for Roll-to-Roll Converters-sponsored (formally AIMCAL) “Web Slitting Technology” courses, I’ve met many process people dealing with troublesome slitting and winding issues. They were looking for a better understanding of the slitting process consistent with winding high-quality finished rolls.
This article condenses a few of many slitting-process steps, tools and ideas from my course that just might help you find that “better understanding.”
Slitting logbook

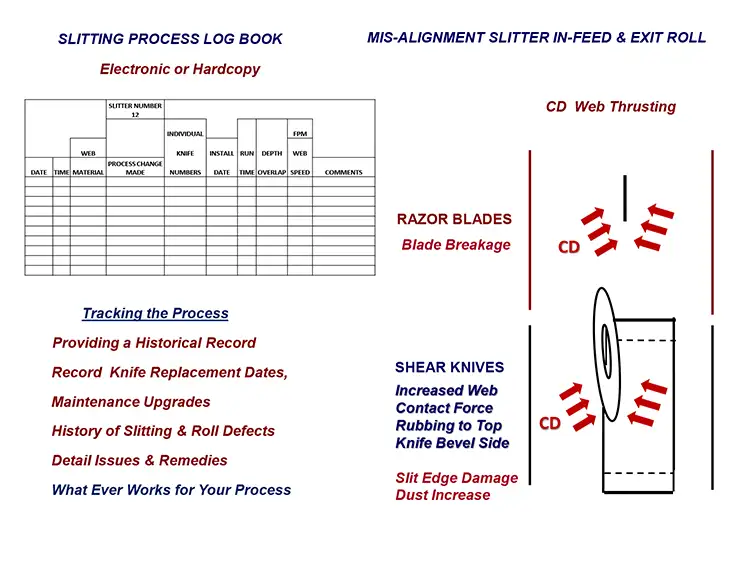
Documenting your slitting-system performance over time is a good place to start (see Figure 1). Do you know how long your knives last before losing their effective sharpness? Do you record dates of knife change or replacement? Do you track if, when and what finished-roll defects occur? And which knifeholders might have been involved? And what steps were taken that resolved the defect issue? Are your holders labeled for data tracking? Do you record when other machine issues occur that negatively affected finished-roll quality.
So, if you don’t have a Slitting Logbook, start one. As a quality-control manager once told me, “Get the points and plot them.”
Roller alignment
The first Rule of Thumb for roller alignment is that a moving web will travel 90° degrees to the roller length. Roller misalignment will push the web off the web path and can cause a variety of roll defects. These include hard wrinkles, baggy lanes, shear asymmetric wrinkles, CD (cross-machine direction) shifting and finished-roll interweaving.
An early slitting-consulting client I had gave me a tour of three different film-extrusion lines in his plant. As we walked from machine to machine, I kept seeing some hard wrinkles running through each extrusion line, so I asked him when was the last time they had their rollers aligned? He said he didn’t know but that he’d look into it. A couple of months later, he told me they had an alignment company come in, and it was found that all the machines had rollers out of alignment, some greater than 0.10 in. (2.54 mm). Realignment of the rollers created totally non-wrinkled finished rolls and ended customer complaints.
So, if you’ve got a slitting machine with some age to it, and you’re seeing some wrinkles, maybe it’s time to bring an alignment company in. The three more common roller-alignment processes are optical, laser and gyro.
Misaligned slitting-zone in-feed and exit roll
When a web is cross-machine (CD) misdirected off the web path, it creates a thrusting force against the slitting razor blades or shear/crush knives (see Figure 1). The amount of thrusting force will vary with the amount of winder pull tension, the web speed and the amount of roller misalignment. The most serious CD-thrust problem, and not an uncommon one, is sever-side contact to a thin razor blade, causing breakage. Can you say “major shutdown?”
CD-thrust force against a shear knife causes increased web rubbing with excessive slitting dust and slit-edge damage. Crush knives also will experience the CD-thrust force with potential slit-edge damage. In addition, slitting-zone exit-roll misalignment can contribute to finished-roll defect issues.
Web-to-idler-roll traction
Web-to-idler-roll traction is extremely important for successful web slitting. Inconsistent traction of the web on a non-driven slitting-zone in-feed idler roll can amplify any bottom-knife run-out slitting defects or create a cambered cut edge that looks like a sine wave running through the machine. This was a defect I saw during another customer visit. Hand-turning of the in-feed idler roll found staggered force levels during rotation.
So, when you can – with the machine down and the web out – use your hands to get a feel of how easily the machine’s non-driven idler rolls rotate. If there are any noticeable rotating-force variations on any of the rolls, especially if you have an older slitting rewind, consider it a call to action.

Shear-knife sharpness reality
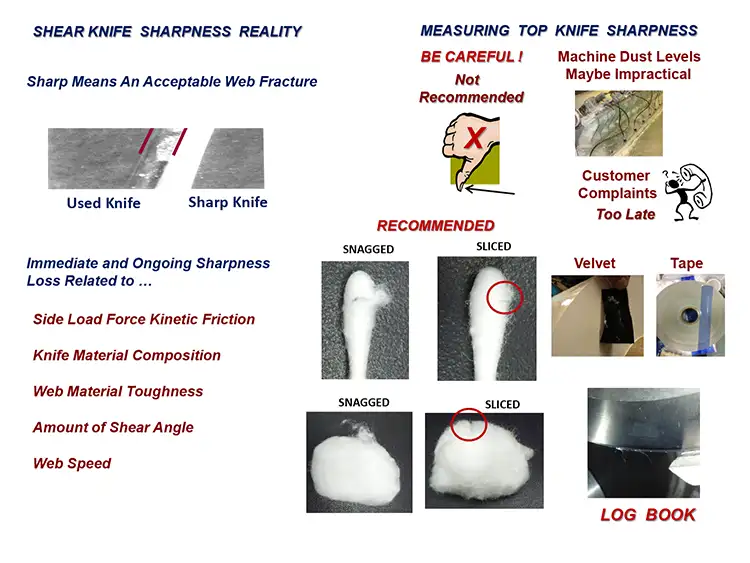
In the slitting processs, the term “sharp” relates to obtaining an acceptable web fracture (see Figure 2). The reality is that loss of knife sharpness begins immediately at slitting start and is an ongoing process requiring future corrective action.
Many factors play a role against knife sharpness. Some are the shear-knife’s side-load force applied and the amount of kinetic friction developed, the knife-material alloy composition and low friction content. The web material: Is it virgin, recycled, how tough is it, does it have abrasive coatings, etc.? The amount of shear angle: 0.25° to 1° or more? The higher the angle the quicker the negative effect on sharpness. Is the process a continuous 24/7 operation with scheduled downtimes or a roll-to-roll process with ramping-up speeds, and what’s the web speed relative to knife revolutions and knife life?
Unacceptably dull knife-cutting edges lead to numerous slitting defects, including fuzzy or rough roll face, dust-in-roll, increased adhesive-web migration, slitter skip, serrated edge and flared edge.
Checking the shear top-knife sharpness
So, how is top-knife sharpness measured? There are a number of ways (see Figure 2) – some good, and some not so good. A very common way is to use your thumbnail. Feel a little resistance and get a little nail dust… may not be good or may be good enough. This is dangerous and not recommended. I knew a knife resharpener who slid the re-sharpened knife on an angle against the palm of his hand hoping for a little resistance. Not good…don’t do this.
Some operations collect increasing amounts of slitting dust after a number of roll-to-roll, unwind-slit-rewind operations for scheduling knife resharpening. Easily repeatable accurate collection methods and consistent timing are needed.
Cotton swabs or balls rubbed against the knife cutting edge is a good and inexpensive way to check knife sharpness as they will find burrs and snags if the cutting edge is not perfect. Consider wearing safety gloves. Check returned resharpened knives, and also why not check a few newly purchased knives before mounting them on the machine?
Regulating crush-knifeholder air supply

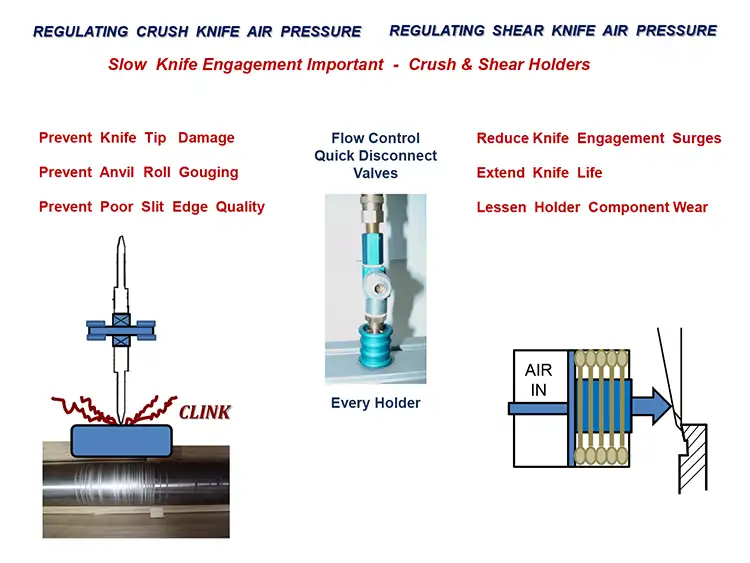
Crush-cutting knifeholders use shop air pressure to engage the knife to the anvil roll for web slitting. It’s extremely important that the air pressure used to engage the knife to the anvil roll be slowly enacted (see Figure 3). A rapid engagement can cause severe knife-tip stress that can result in tip failure that then causes a poor slit edge and anvil-roll gouging. A loud knife to anvil-roll contact “clink” sound is a “red flag.”
All your knifeholders should have individual flow-control valves with quick disconnect and shut-off capability. Additionally, I am assuming you know what air pressure is needed to fracture your web, and that you set the air pressure/load levels slightly higher than maximum to extend knife life as long as possible.
If you don’t know exactly how much force is needed, it is worth investigating to potentially extend your knife life. In-house lower pressure testing might not be practical, so you might consider contacting your knifeholder supplier for some pressure-force lab testing of your web material.
Regulating shear-knifeholder air supply
Shear-slitting systems use the same pneumatic equipment as crush-cutting systems do: Manifold, pressure regulator, gauges and hoses. Slow knife engagement is important here also (see Figure 3). Shear-knifeholder air-flow control valves will reduce engagement travel surges that may cause unnecessary mechanical impact levels during knife-to-knife, cutting-edge contact. This also may prevent accelerated wearing down and looseness of internal holder components.
Quantifying and controlling slitting dust
Every slitting web fracture creates dust particles, in all the slitting methods (see Figure 2). A certain amount of slitting dust may or may not be acceptable. Having a method to know how much dust there is (and comparing that to previous production runs) can let you know when corrective steps are needed. One measuring method uses a strip of black velvet to swipe the face of a finished roll. Another quantifying method is to use a strip of tape pressed against the finished-roll face. Establish a repeatable procedure, take photos, keep samples and enter the data in your increasingly valuable Slitting Logbook for reference.
There are numerous ways to remove slitting dust from a web. There are web-contacting tools and non-contacting tools. Contact tools include a vacuum brush roller or a sticky-tape roller. Non-contact tools include static-ionization neutralization and vacuum systems. It’s vital that you contact suppliers for your application. Note: Because the web contacts the slitting knife/blade, a high smoothness of that tool can help lessen the amount of dust created.
Shear-knife surface finish
Metal finish is measured in Ra and Rms values. A standard minimum knife finish should be 8 to 12 Rms. The finer the knife-surface finish the cleaner the web fracture with less slitting dust. A fine-grit tumbling process during manufacture is one way of taking the knife face to a superfinish at 1 to 2 Rms. It makes the web-contacting area smoother, thereby benefitting the fractured web-edge quality; then the primary cutting angle also should be ground to a superfinish. These procedures might have an added cost.
Now, if your slit-edge quality always is acceptable, there’s no need for the added expense, but, if you have an occasional, bad and unacceptable roll face, it might be worthwhile trying a few polished knives in your process.
Gauging shear-knife contact force

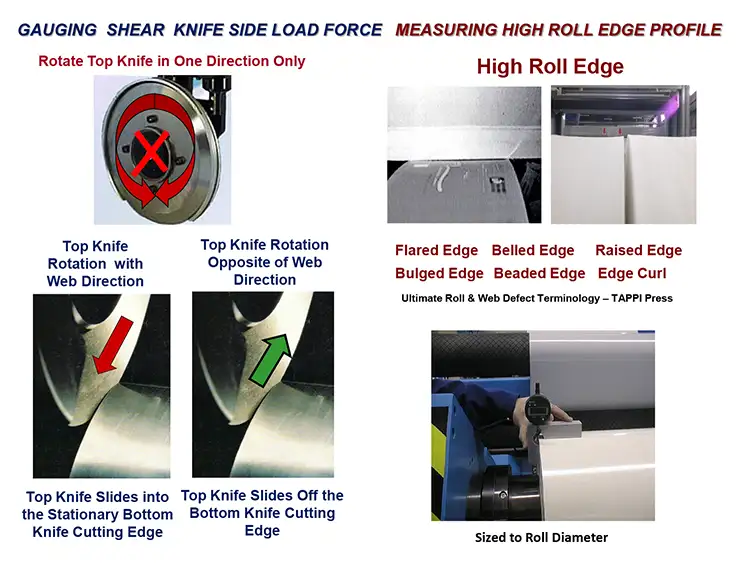
During manual shear top-knife-to-bottom-knife setup, an assessment of knife side-load contact force is needed to be confident they’ll stay in contact during operation (see Figure 4). This “measure” often is done by hand-feel with both clockwise and counterclockwise rotation of the top knife. This is a mistake. The top knife should be rotated in one direction only, not both directions.
The question then is: Which direction is the correct direction? Should the top knife be rotated with the web-path travel direction? Or should it be rotated opposite the web-travel direction? Think about this, the bottom knife has a sharp cutting edge. It is harder than the top knife and is stationary, not rotating when you are gauging the knife contact force. Essentially when the top knife is rotated into the bottom knife in the web-travel direction, under the side-load contact force, the top-knife sharpness can be potentially damaged.
The correct rotation is to rotate the top knife opposite the web-travel direction. The top knife then slides off the bottom knife’s cutting edge, not into the harder sharp edge. There may be some minor deformation but minimum damage,
if any.
Measuring high roll-edge profile
High roll-edge profile is a common finished-roll defect (see Figure 4). It’s sometimes called a flared edge, belled edge, raised edge, bulged edge, beaded edge or edge curl. All those names indicate a very common problem for many different web materials.
If this is a common slitting problem for you, being able to measure the amount of high-edge profile for finished rolls may be a good way to better understand and help control your slitting process. The Wager-Meter is an excellent tool for getting exact dimensional comparison data from slit finished rolls.
Checking top-knifeholder looseness
Over time, the operational forces required for shear slitting take their toll on knifeholders. Time- and force-worn holder components will increase internal clearances. A loose shear-knifeholder head assembly will lessen the shear angle and potentially, over time, create an open cutpoint that the web bunches up against during fracture. A very poor cut edge and increased slitting dust will result.
Wearing your safety gloves, grasp the knife-head assembly and rock it side-to-side to get a feel of the holder’s level of looseness. Serious movement and lost finished-roll quality may require rebuild or replacement.
For further information, you can find the full “Web Slitting Technology” course on the ARC website (www.rolltoroll.org) or contact me directly.

Dave Rumson has 15 years of experience as a slitting educator/consultant and 35+ years of roll /shaft handling, unwind/rewind equipment and web-slitting experience. The past 22 years include 10 years with Dienes USA and Sigmala, Ltd., the latter having developed a computer/servomotor-controlled shear knifeholder. For almost 30 years, Dave has developed and conducted technical presentations for CEMA, AIMCAL and TAPPI. He currently serves on the ARC Technical Advisory Panel, its Web Handling Committee, and writes the “Cut Points” Q&A column for Converting Quarterly. Dave also manages the 2,000-member Slitting Community Group on LinkedIn. He can be reached at 860-256-5658, email: drumson@maine.rr.com, www.drumson.wordpress.com.

